
I’m a sucker for Rustic Wood Signs. They’re easy to make and really, you can’t do it wrong. Even if you think you’re doing it wrong, nobody will know you did it wrong. It’s rustic and chippy and perfect! This is not a pallet wood sign, it’s just a plain common wood board so here’s my technique on how to make a plain wood board look rustic.
{this post contains affliate links referencing products used}
How to make a Plain Wood Board Look Rustic
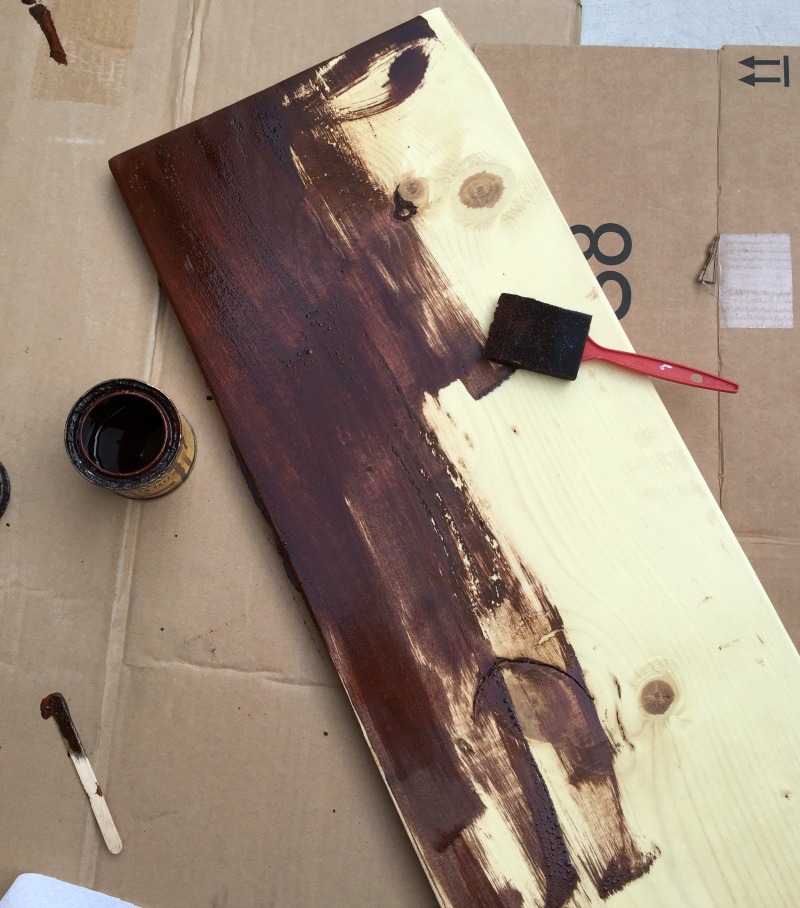
To make a Rustic Wood Sign, I first stain the board with a dark stain. I used English Walnut Stain for this board but I also love MinWax Jacoean too.
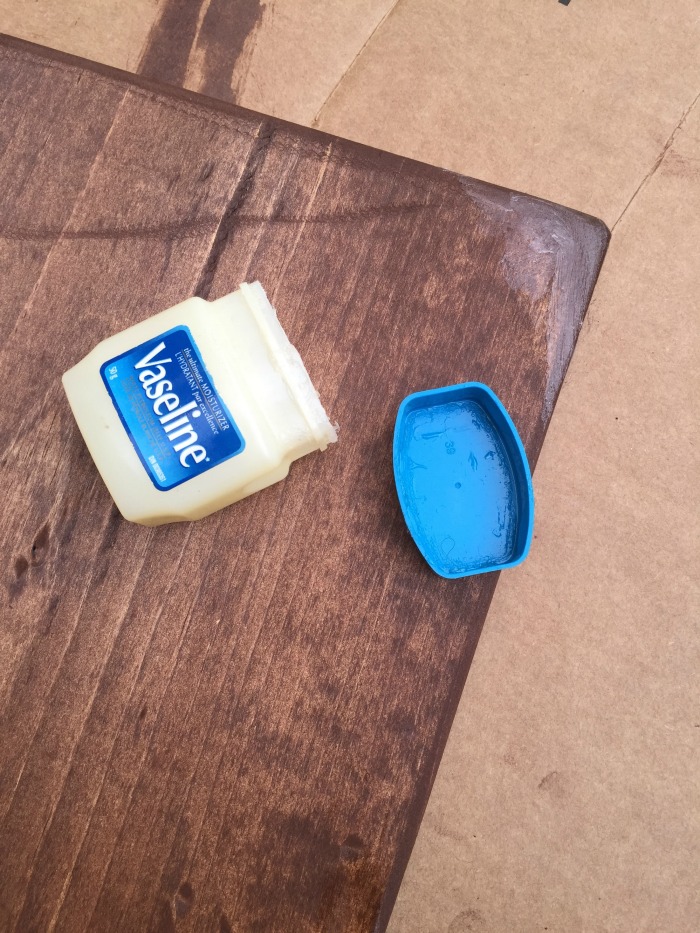
After the stain was dry, I applied a coat of Vaseline around the areas I wanted the stain to show through. Just apply the Vaseline with your fingers, smear it on the board not too thick but all around the areas you want the stain to show through. Remember, you can’t do this wrong!

Then, spray paint the whole board with white spray paint . It will probably take a few coats of paint to cover the board if you are using a dark base stain. I like to use spray paint because paint and a brush tend to smear the Vaseline all over the board. It gets in your paint brush, smears all over the board and sorta makes a mess in my opinion.

After the spray paint is dry, wipe off the Vaseline’d areas with paper towel. The paint should chip off the board leaving the stained wood showing underneath. Now, use an electric sander to distress any other areas around the board you want to look old until you achieve that rustic, chippy look we all love!
There are lots of techniques on How to Make a Rustic Wood Signs but this is how I do it so, I hope it inspires you to give it a try too. Remember, you can’t do it wrong.. just do it! Click on the images below to see my Rustic Wood signs made with this technique.

Click on images to view more Rustic Signs and other creative Project Tutorials


 Amy Coose says
October 19, 2015 at 8:27 amI love seeing all your projects, and I’m sure your sister loved the sign. If I could change anything about my kitchen, I’d add a backsplash.
 Brittany says
November 11, 2015 at 8:45 pmOh. My. Goodness! THIS is beyond cute! I literally just finished a similar project five minutes ago.I love how you used a stain! You did a great job!
 Holly Gagnon says
November 12, 2015 at 3:23 pmThank you Brittany. Endless possibilities with wood for sure! Holly 🙂
 vickie says
November 13, 2015 at 11:35 amThanks!!
 Amy Jo says
January 4, 2016 at 2:20 pmI’m having a hard time finding English Walnut stain. (And I REALLY love the color you have!) What Brand did you use?
 Holly Gagnon says
January 4, 2016 at 8:22 pmThanks Amy Jo. The stain is I used is Minwax English Chestnut which is sold at Home Depot. Should be easy to find. Good luck and Thanks! Holly 🙂
 Reagan Bates says
February 4, 2016 at 10:03 amWhat font did you use for the “blessed”? This sign is adorable!
 Holly Gagnon says
February 5, 2016 at 12:16 pmThank Reagan. The font is called Grand Hotel and I had to weld the letters together to make a continuous script. Holly 🙂
 Veronica says
May 7, 2016 at 7:36 amI was curious what grain of sand paper did you use?
 Holly Gagnon says
May 7, 2016 at 7:51 amHI Veronica, I use an electric sander to disptress my signs. I think I buy the fine grit package. Thanks for stopping by- Holly
 James Queen says
May 31, 2016 at 11:34 amI thought this was a sign but you still have to use a something for the letters or route them or am I just stupid
 Holly Gagnon says
July 9, 2016 at 3:42 pmHi James, thank for visiting my blog. At the bottom of my post I have a link to the sign I made out of this board. Basically, I used my Silhouette to make a template then painted in the letters. Holly
 Karen says
June 29, 2016 at 4:08 amWhat kind of wood do you recommend using for your wood signs?
 Holly Gagnon says
June 29, 2016 at 8:04 pmThanks for visiting Karen, I just use plain common wood boards from Home Depot for all of my signs. Holly
 Mary says
April 20, 2017 at 3:43 pmAny particular wood ??? Size ??
 Holly Gagnon says
April 20, 2017 at 10:01 pmHi Mary. Any wood board would work depending on the size of the sign you want to make. Good Luck! Holly 😉
 Diane Decker says
July 9, 2016 at 3:53 amHow do get the lettering on the board?
 Holly Gagnon says
July 9, 2016 at 3:40 pmThanks for visiting Diane, at the bottom of the post, I have a link to the tutorial of the project I made. Basically, I used my Silhouette to make a template then painted in the stencil. Holly
 Chris says
August 11, 2016 at 11:17 pmI have limited time as we have 3 yr old twins and a 6 mo old. Could you make me a sign very similar to the Florida, Ky, KS blessed sign. I am willing to pay so please let me know. Thanks! !!!
 Shelly says
October 3, 2016 at 8:18 pmIf I don’t have a sand blaster in making wood signs, can I just use sandpaper to get the same effect?
 Holly Gagnon says
October 3, 2016 at 9:56 pmHa, thanks for visiting Shelly. Sure, you could use sandpaper. The paint chips off really easy over the Vaseline so you may not even need to much sanding. Good luck! Holly
 Shelly says
October 3, 2016 at 8:22 pmSorry. I meant electric sander not sand blaster (a construction wife)
 Abby says
November 28, 2016 at 7:59 amHello! What type of paint do you use for the lettering (white)? Is it a pen or actual paint? I am freehand writing mine and anything to make easier!?
Thanks!
 Holly Gagnon says
November 28, 2016 at 11:42 amHi Abby. I usually just use regular craft paint when I do letters. Otherwise, it’s white spray paint to cover the whole board. Good Luck! Holly
 Melissa says
November 28, 2016 at 3:17 pmIf I wanted the sign to be just the rustic color do you still out baseline on it, or just paint it with the stain?
 Melissa says
November 28, 2016 at 3:19 pmSorry autocorrect… vaseline not baseline 🙂
 Holly Gagnon says
November 28, 2016 at 11:43 pmHi Melissa, did you read my tutorial? The wood board is stained, then rubbed in areas with Vaseline then the whole board is spray painted with white paint. After the paint dries, wipe off the Vaseline areas so the stain will show thru and use a sander or sand paper to distress it as needed. Then you can use stencils as a template to paint letters or freehand words, etc. Hope that helps – Holly
 Silvia says
December 17, 2016 at 4:17 amBeautiful project and blog! Thank you for sharing your talent. Keep doing what you are doing!
 Holly Gagnon says
December 18, 2016 at 11:04 pmThanks so much for visiting! Holly 🙂
 Cathy Helms says
January 2, 2017 at 11:41 amthanks for these first projects sounding so easy -can’t wait to try some for next year gifts.got to think ahead.
 Holly Gagnon says
January 3, 2017 at 10:26 pmThanks for stopping by Cathy! Holly 🙂
 Marilou Bautista-Godhe says
February 1, 2017 at 7:20 pmThanks for your creativity, I’m just trying to know how to make this wood sign. Im just learning and very grateful with the talent that you’ve shared. Greatly appreciated:) Would you pls. email me a link how to do the letters to write on the board.Thanks again!
Marilou
 Holly Gagnon says
February 3, 2017 at 10:30 pmHI Marilou, thanks for visiting. To paint the sign, I used my di cutting machine to make a paper template, traced it on to the board then painted in the letters. Hope this helps- Holly
 Lori says
July 12, 2017 at 10:35 amWould a vinyl stencil work? Does it pull up the spray paint?
 Holly Gagnon says
July 16, 2017 at 6:57 pmOnce the spray paint is dry, any type of stencil or vinyl should work great. good luck! Holly 🙂
 Kelley says
March 26, 2017 at 7:37 pmThis worked fantastically, thank you for sharing!
 Holly Gagnon says
March 28, 2017 at 9:23 pmThanks Kelly! I love hearing from my readers if my projects work out for them too. Holly 🙂
 Sandy says
March 29, 2017 at 10:29 ami have wood that is not smooth. Id like to stain it but not sure if it would look ok chunky. What are your thoughts
 Holly Gagnon says
March 29, 2017 at 8:31 pmHi Sandy, can you sand down the wood some? I think the whole technique would look fine with wood not smooth, give it more a rustic look. Good Luck! Holly
 Sarah says
March 30, 2017 at 5:34 amYou do beautiful work, loved it all, thanks for sharing.
 Holly Gagnon says
March 31, 2017 at 11:41 pmThanks for visiting Sarah! Holly 🙂
 Sylvia says
June 5, 2017 at 4:02 pmHolly,
I’m always working on new things and have always wanted to learn how to make the rustic signs just because it’s so cheap and you can do so much….. In the process of decorating my sons first house. I had found a old wooden sign that originally said love….. with your great and easy technique I’m going to make it in to a sign with his name and girls name with the date they moved in…THANK YOU FOR THE VERY EASY TO FOLLOW INSTRUCTIONS!11
 Holly Gagnon says
June 6, 2017 at 9:44 pmThanks great Sylvia! Thanks so much for sharing you idea, good luck! Holly 🙂
 Sylvia King says
August 21, 2017 at 12:06 pmI came across some wood and decided to make them look like vintage signs so I stained them then painted them and before the paint dried I took water on my brush and went over the paint and wiped
areas to let the wood show thru so it looks like they signs faded. It looks rally cool.
 Holly Gagnon says
August 22, 2017 at 3:04 pmGreat idea, thanks for the tip! Holly 🙂
 Melissa says
August 30, 2017 at 7:44 pmHow do you get the vinyl letters to stick to wood signs?
 Holly Gagnon says
August 31, 2017 at 4:42 pmHi Melissa thanks for visiting. On this particular sign, I didn’t use vinyl but on other signs I’ve made, I just apply the vinyl on to the wood. Never have had an issue before with it sticking either. Hope that helps. Holly 😉
 Samanthe says
November 26, 2017 at 6:15 amHi! Did you spray your sign with a clear finish after your we’re completly finished with your sign? I just made this sign, and I love your easy process on making a distressed sign!
 Cristy says
November 30, 2017 at 8:26 pmHi! How did you secure and attach the wood pieces together?
 Holly Gagnon says
December 4, 2017 at 9:15 pmHi Cristy, thanks for visiting. I’m not sure what you mean attach wood pieces together, I used one big board. Holly
 Kathy says
January 8, 2018 at 9:23 pmHolly, I’m so excited to try this. I’ve been wondering how to age wood. Was thinking of buying a bunch of wood and let it sit outside in my backyard for a couple years and weather…but that’s not timely when I want to make them now!! Lol. Thank you so much…i can’t wait to get started. Thanks for sharing the info freely.
 Holly Gagnon says
January 16, 2018 at 11:15 pmThanks for visiting Kathy. Yes, this wood distressing technique is awesome and definelty quicker than waiting on actually aging. I have used steel wool and vinegar to age wood but I like this way much better and smells a lot better..lol. Good Luck! Holly 🙂
 Terri says
December 9, 2018 at 5:33 pmHow do you do letters etc? Stencils?
 Joy says
November 1, 2024 at 3:10 pmI have seen several of your blog posts and enjoy trying them.
In the future, please make you font a darker color. The gray is very light.
Thanks