
When the Holiday’s come around, many of us like to give little gifts or baked goods to the people we love. This One Sheet Gift Box is perfect for those special occasions, can be made in a flash and uses only a sheet of 12 x 12 scrapbooking paper! That’s it. How cool is that? Most of us have plenty of scrapbooking paper laying around.

{this post contains affliate links referencing products used}
How to make a One Sheet Gift Box
I kept the box simple since the paper is so pretty and added a few flower rosettes cut from Cricut Flower Shoppe cartridge, wrapped the box with a raffia bow and stamped a Thankful sentiment.

- Using a Score Board, score one sheet of 12 x 12 paper (27 x 27 cm) at 3″ and 9 inches
Metric: 7.62 cm and 22.8 cm
- Rotate paper and Score at 1″, 3 1/2″, 6 1/2″ and 9 inches.
Metric: 2.54 cm, 8.9 cm, 16.5 cm and 22.8 cm

- Cut down to the middle score lines
- Cut tabs off the corner op of sheet to make lid.
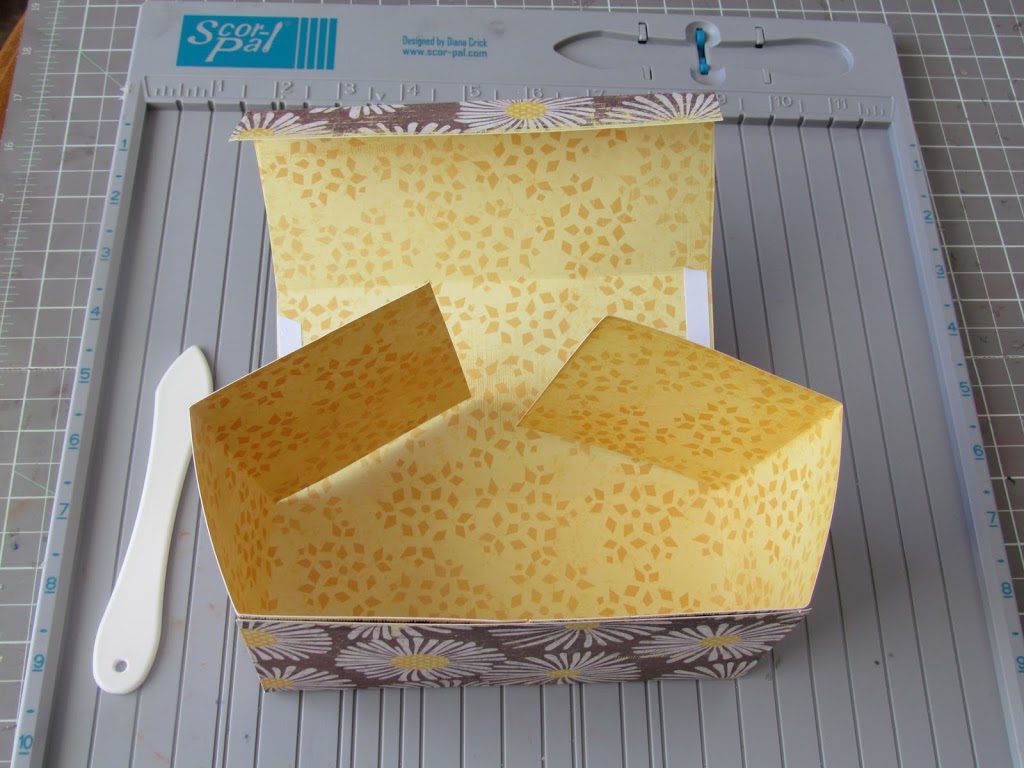
- Fold on score lines
- Tape with box together using a strong adhesive
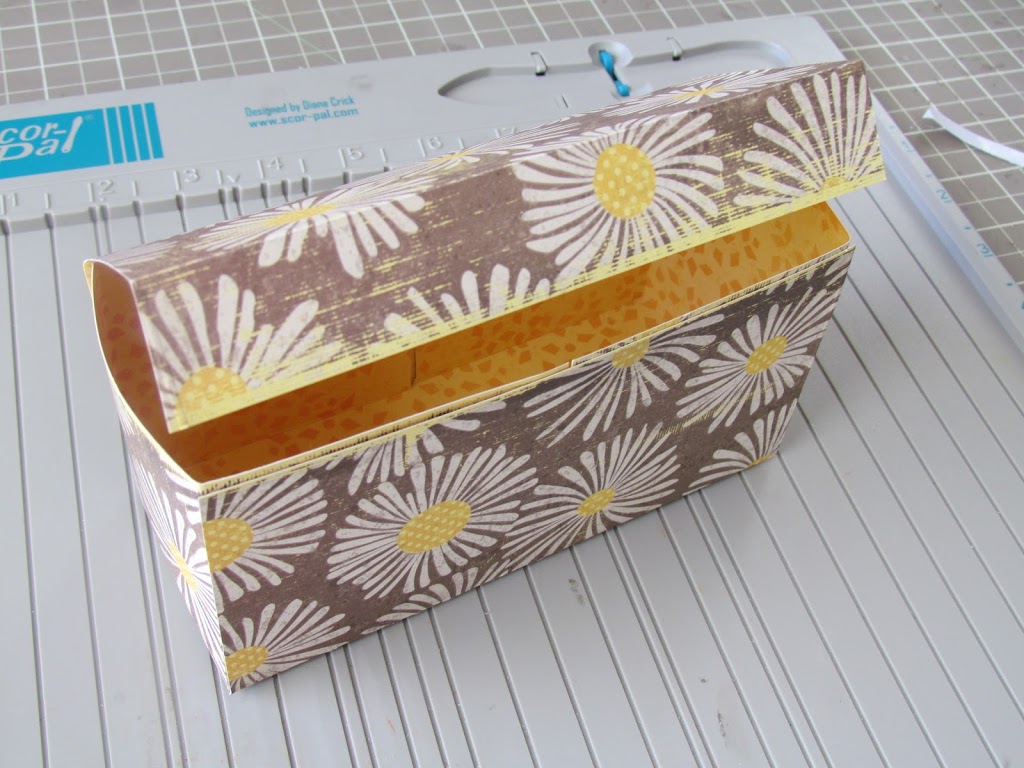
Voila! A simple One Sheet Cookie Box with endless gift possibilities.
Nw just decorate your box for any occasions! For this Fall box, I stamped a sentiment on to a tag and made pretty rolled flower rosettes cut from Cricut Flower Shoppe cartridge.
Such a easy and cute box, huh? What’s great about this One Sheet Gift Box is it can be customized for any theme! All you have to do fill it up with your favorite cookies or treats. If you don’t have time to make it now, just print off the instructions!


Click on images to view other Tutorials like this One Sheet Cookie Box:


 CRAZY4CHRIST says
November 4, 2011 at 10:55 amVery pretty box love the flowers!! Thanks for sharing how it is made!! Happy Birthday to your little girl!! Well for my own birthday the only place I can think of is the bowling ally, o I did have a birthday party once at White Rose(it was a craft store here where I live). Thanks for the chance to win!!
Kristan (follower)
sierrababy08 at hotmail dot com
 GiGi says
November 4, 2011 at 5:26 pmbeautiful box! I love the rafia and paper flowers! Thanks for playing at Whimsical Wednesdays!
 Lisa says
November 4, 2011 at 7:49 pmGreat project, love the extra touches of the rosettes and raffia.
Thanks for joining us at The Friday Mashup!
 Kasey says
November 4, 2011 at 8:30 pmHi Holly, great project, you’re right about that paper not needing much so your rosettes and raffia were just the right touch.
Thanks so much for sharing this with us.
Cheers,
Kasey ~ in Oz
Friday Mashup DT
 Lisa says
November 5, 2011 at 12:07 amSuch a sweet box and perfect for some goodies, too! Great idea! I had a super fun time playing lazer tag for a b-day party.
 Kim P says
November 5, 2011 at 3:43 amWhat a great gift box! I love raffia for fall projects…and the rosettes are perfect! Thanks for playing the Friday Mashup!
 Julie Gearinger says
November 5, 2011 at 11:22 amOh I love this idea of one sheet of paper for a box! The paper looks wonderful and stands alone for design and love your rosettes as well! Thanks for joining us at the Friday Mashup!
 Melin says
November 5, 2011 at 2:28 pmLove your box and project Holly! Happy birthday to your daughter and many blessings for many more years. I will be thinking of you at chuck e cheese tonight…Boy I remember those days!!!
Melin
Blog: CookingWithCricut.com
Shop: PaperCraftingWorld.com
 joni says
November 5, 2011 at 3:26 pmGreat box! Love the flowers on the front…so pretty! Thanks for playing along with us at Whimsical Wednesdays!
hugs,
joni
 Karen says
November 6, 2011 at 12:30 amHolly thanks so much for linking up you adorable box! I really like it I am going to make one tomorrow I have the perfect flowers for it have had them forever!
 Linda says
November 6, 2011 at 4:36 pmHave fun at Chuck E Cheese. We had my grandson’s birthday there last year. Great place for a party. Your daughter will have a blast! Happy Birthday to her!
Linda
http://www.craftingwithnana.blogspot.com
 Jen says
November 6, 2011 at 5:30 pmThanks for sharing how to make your own box! I found your blog through fantabulous cricut and I loved your Halloween and Fall wreaths! I’m going to have fun browsing through your blog…I am a new follower! 🙂
 Heidi Baks says
November 6, 2011 at 8:55 pmVery cute! Thanks for sharing with us at the Friday Mashup.
 scrappingnana says
November 6, 2011 at 9:17 pmGreat project and it seems so easy to make. I will have to try one. Love the raffia bow also. Thanks for the tutorial.
Happy Birthday to your daughter. My granddaughter’s BD is Nov. 6th, she is 24.
 Sherrie K. says
November 6, 2011 at 9:41 pmSuper cute little box!! I love the little flowers and what a great box to give a gift in:)Thanks for the idea and great tutorial.
Also, congrats on your spotlight Sunday over at FCCB! Your projects are awesome!
Happy Birthday yo your daughter-have a fun day!
Sherrie K
http://sherriescraps.blogspot.com
 Sue S. says
November 6, 2011 at 10:26 pmLove the box and rosettes!! We just had my son’s birthday party at Pump It Up – it was awesome!!! Hope your daughter had a great day! I am a follower.
sueot33@yahoo.com
 *Star says
November 6, 2011 at 11:10 pmPretty box. love the paper flowers. Great job on the challenge and thanks for playing with us at Whimsical Wednesdays.
 jkstiles77 says
November 7, 2011 at 1:30 amVery cute box! I immediately went and made one for myself … the directions you gave were so simple and I can see making a bunch of these for gifts at Christmas. Thanks for the tutorial!
 Shelly says
November 8, 2011 at 10:13 pmHolly, thanks for the tutorial! The box is fabulous! Those flowers are awesome!! Love the paper and colors!
Shelly
 Darla says
November 9, 2011 at 3:54 amGreat project!! TFS the tutorial too. Beautiful!!!
I think my favourite place to go for my bday parties as a kid was paintball. We loved it!!
 Cindy says
November 10, 2011 at 10:37 amAWESOME job with your box,LOVE the pretty flowers!Thank you so much for playing along with us at Whimsical Wednesday!!:)
 Holly says
November 10, 2011 at 4:48 pmWhat an adorable box.. I love the flowers you made for it.. Great colors for Fall. Thanks for joining us at the Friday Mashup!
 Nanne says
November 13, 2011 at 7:29 amthat is such a great box and thnx for sharing the tute with us..
thnx for sharing this with us over at Whimsical Design
hugs
Nanné
 Sonja Schiller says
May 15, 2014 at 5:33 amI found your idee via pinterest. Thank you for the instruction.
glg
Sonja
 Joan Lowder, your Stampin Up creative coach says
May 18, 2014 at 10:38 pmLove the cookie box. Very cute and easy to make. Assuming bought cookies, since the box is deep, just wondered if you had a choice of cookies that fit. Now to think of what cookies would be best. Looks like it could hold a good amount. Just curious. If anyone can email me what you used, hugs in advance. jlowder1@bellsouth.net
 Susan Duncan says
November 14, 2014 at 5:35 pmI love this box, so I thought why not try to make a smaller one. So I used a 6×6 paper and divided the score lines by half. Worked great! They can hold four little tea lights inside, and with a few simple decorations with a tea light holder included you have a nice little gift for not a lot of money! Oh and small slices of fudge work inside as well!
 Holly Gagnon says
November 15, 2014 at 3:24 pmYay! Thank you so much Susan for sharing this great idea! Holly 🙂
 Susan says
August 25, 2015 at 11:42 amawesome idea! So wonderful for homemade gifts!
 Holly Gagnon says
August 27, 2015 at 9:16 amThank you Susan! Easy gift idea too. Holly 🙂
 Erica says
August 30, 2015 at 12:51 pmWhat are the dimensions of the finished box?
 Holly Gagnon says
September 1, 2015 at 10:51 pmHello. The box dimensions are 6 x 2.5 x 3. Thanks for asking! holly 🙂
 Julianna says
December 17, 2015 at 4:50 amMy kids and I make cookies for their teachers every year for Christmas and we just made one of these to put them in! It turned out awesome…so simple, affordable and soooooo cute. I don’t have the scoring tools but improvised and it came out great! Thanks for posting…I’m sure I will be using these for many years to come ?
 Holly Gagnon says
December 17, 2015 at 9:28 pmThanks for sharing that Julianna! So happy it worked out still without a score board. Happy Holidays to you! Holly 🙂
 Christiane says
May 9, 2016 at 7:47 pmThanks for a great idea. Will try my hand at it.
 Holly Gagnon says
May 15, 2016 at 10:05 pmThanks for stopping by Christiane! Holly
 Bill O'Connor says
June 3, 2016 at 1:03 pmSuch a great way to make a unique box for someone special. It’s often the little things people appreciate the most. Muslin or Burlap gift bags are also a great back up for gift giving. You can make them unique with stamps, ribbons or tags.
 Holly Gagnon says
June 8, 2016 at 2:30 pmYesm it a great little box. Thanks so much for stopping by. Holly 😉