
I have a Heart Garland that I made last year hanging up on a mirror in my bedroom. It matches my bedroom colors and decor. It’s held up well and I enjoy looking at it everyday. My husband tells me to stop looking at it. Pfft! I love it. I decided to make another “year-round” Heart Garland to enjoy in my craft room.

{This post contains affliate links referencing products used}
Heart Garland Tutorial
Supplies used to make Heart Garland:
- 1″ wide patterned paper strips cut with paper trimmer
- 1 inch Glue Lines®
- Ultra Thin Glue Dots®
- Paper Trimmer
- Assorted Buttons
- Hole Punch
- String
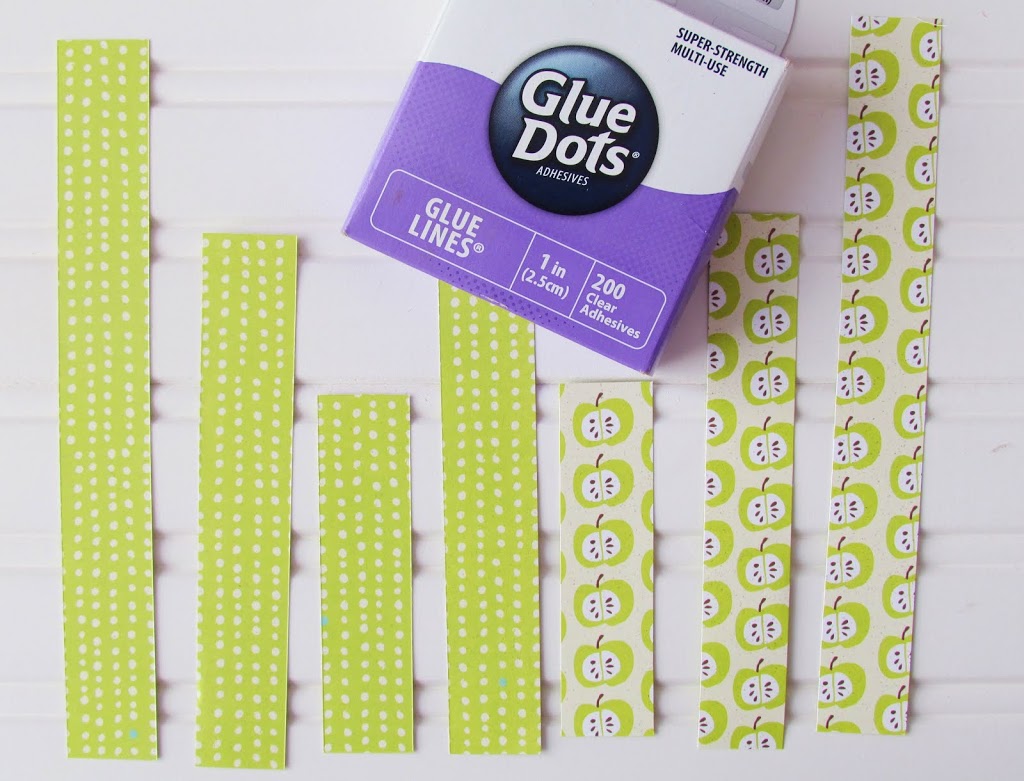
Cut patterned paper into 1″ wide strips.
You will need 2-8″ strips, 3-6″ strips and 2-4″ strips to make one heart.
Lay out 7 strips of paper in this order: 8″,6″,4″,6″,4″, 6″, 8″.

- Apply 1″ Glue Lines® to the bottom of each strip and adhere together.
- Starting with one side of the heart. Choose the 4″ strip to bend and adhere with 1″ Glue Lines® to the center of the middle 6″ strip.
- Choose the next 6″ strip to bend and adhere with 1″ Glue Lines® behind the 4″ strip
- Choose the outer 8″ strip to bend and adhere with 1″ Glue Lines® behind the 6″ strip.
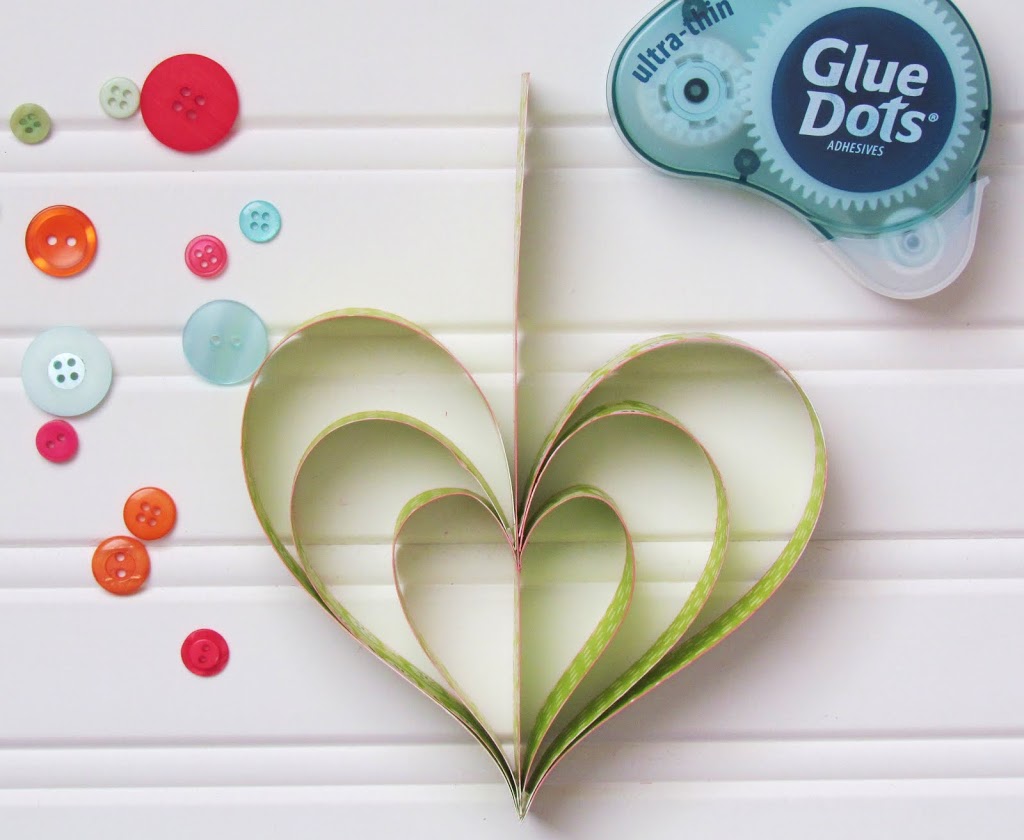
Repeat the above steps to complete the other side of the heart.
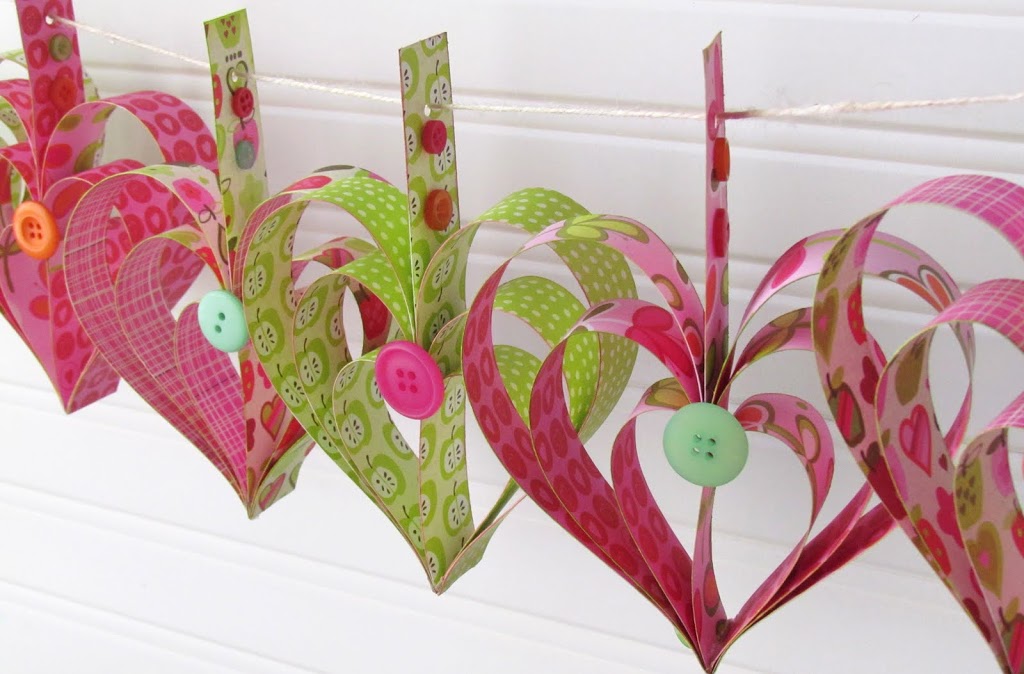
Using Ultra Thin Glue Dots®, embellish the heart with various buttons.

Punch a hole in top of heart and string together with other hearts.
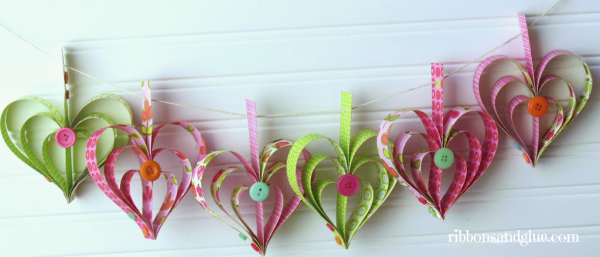
Ooh, Ahh..so pretty and simple.
You know you want to make one now, right?.
I made this Heart Garland a few hearts longer than the one in my bedroom. It looks great in my craft room too and hubby can’t say a thing about it.


 |
| This post is written while participating as a member of the Glue Dots® Design Team. |
Click to view more papercraft tutorials like this Heart Garland Tutorial


 Rhonda Emery says
January 25, 2013 at 1:21 pmlove your hearts thanks for sharing. hugs
 teachdanz says
January 25, 2013 at 3:26 pmI love this Holly!! I am doing a Valentine’s party for my 10 year old and this would be a perfect project for them – not too difficult but super cute!! thanks!!
http://teachdanz.blogspot.com
 Shelly says
January 25, 2013 at 5:22 pmSuper cute Holly!
 Karon says
January 25, 2013 at 7:02 pmFabulous banner Holly – how awesome are those hearts, just a wonderful quick idea:-) TFS
 Mary Ann says
January 26, 2013 at 11:50 amVery pretty,Love it,thanks for sharing…
 Scrappin Rabbit Designs says
January 27, 2013 at 12:15 pmLove your pretty heart garland. Thanks for sharing the details.
 Jill says
January 27, 2013 at 10:16 pmVery cute Holly!
 K Coake says
January 28, 2013 at 2:05 amIt is so pretty! I love the colors and the paper you chose.
KC
 Laurie@SimplyCreatingHome says
January 28, 2013 at 6:16 amWhat a sweet design for a garland! I love this and will be pinning. Thank you for sharing!
 Dorlene Durham says
January 29, 2013 at 2:28 amYour garland is so cute! I love the colors and your tutorial was very easy to understand. Now to make mine…thanks for the inspiration!
 apieceoflifespie.com says
January 29, 2013 at 7:16 amhow did I miss this? {LOVE}! Ok, I need one about 8 feet long! LOL!
 Emily says
January 30, 2013 at 3:13 amYour garland is simply lovely. 🙂 I love the colors you used and the buttons really add a beautiful touch! I’m your newest follower!
Visiting from Craft-o-Maniac.
~Emily @ Texas Life Blog
 Christina at I Gotta Create! says
February 2, 2013 at 2:45 amI love the garland! Happy colors and cute little buttons… I’d be looking at it every morning too 🙂
Thank you for partying with the Wildly Original Crowd.
<3 Christina at I Gotta Create!
 Michelle Hargreaves says
February 2, 2013 at 9:35 pmI love this! I think I’ll make one for my living room in teal and white patterns. So cute I’ll want to leave it up all year. 🙂
 Christina at I Gotta Create! says
February 7, 2013 at 1:23 amYou’re a STAR tonight over at I Gotta Create! This little garland is so sweet.
http://igottacreate.blogspot.com/2013/02/be-mine.html
Thanks so much for linking up,
<3 Christina
 Khristina aka Khris says
March 17, 2013 at 7:57 amVery cute..thanks for sharing. I have blogged about this post on Freebies For Crafters too.
Hugs Khris
 Tina Pippo says
April 1, 2013 at 11:42 amWonderful tutorial! I loved the outcome!
Great post!! I included it in my post Βόλτα στη Γειτονιά #26 🙂
Have a great week!!
 jeannie says
January 6, 2015 at 8:10 pmThis is just beautiful! I can see why you don’t get tired of looking at it! may I ask what papers did you use? love the bright colors in it. almost looks like a Jillybean paper. thanks for sharing this.
 Holly Gagnon says
January 7, 2015 at 7:15 amThank you! This garland is a couple years old now but the paper was from an old K & C paper pack I picked up from Micheal’s. Holly 🙂
 Patricia Yingling says
January 11, 2015 at 5:07 pmThank you so much, such a simple and quick idea! My house looks so sad without all of the Christmas decorations, this will be perfect. So kind of you to share the tutorial, I appreciate it!
 Holly Gagnon says
January 12, 2015 at 10:24 pmThank you so much Patricia, glad I inspired you. Holly 🙂
 Di says
January 13, 2016 at 9:59 amSuper cute, quick & easy – trimmer, paper and glue at the ready!!
 Holly Gagnon says
January 13, 2016 at 11:01 pmThanks Diane. Yes, its an easy and fun craft to make! Holly 🙂
 Carol Nagle says
February 3, 2016 at 4:03 pmSo cute! I am going to make and send to my 95 year old mom to put up in her nursing home room! Just one question: do you have to use double sided paper?
 Holly Gagnon says
February 3, 2016 at 9:48 pmHi Carol. What a great idea! You can use regular one sided paper or double. Doesn’t matter as long as you don’t mind one side being white. You could also stamp on the white side to add some color. Thanks again, good luck- Holly
 tina says
February 4, 2016 at 1:18 amI shared your heart garland idea and the link here: http://twinkleteaches.blogspot.com/2016/02/i-heart-it.html
Love it!
 Holly Gagnon says
February 5, 2016 at 10:06 amThank you so much Tina! Holly 🙂
 Bev says
April 8, 2016 at 4:50 pmDrats, I just found your blog. I could have made one for Easter. Will be checking my paper supply, I don’t have many double sided designer paper or card stock. One thing for sure, I will be making one to hang in MY craft room. Thank you.