Ribbons & Glue

a DIY Craft blog sharing unique projects and tutorials along with a few simple recipes thrown in.

  • Facebook
  • Pinterest
  • Instagram
  • Twitter
  • RSS
  • Blog
  • About Me
    • Creative Resume
    • Published Work
    • Craft Room Tour
  • Crafts
    • All Tutorials
    • DIY Projects
    • Wood Projects
    • Wreaths
    • Handmade Cards
    • Upcycled Projects
    • Simple Sewing
    • Best Craft Adhesives
    • DIY Decorative Clothespin Crafts
  • Seasonal
    • Valentine’s
    • St Patrick’s Day
    • Easter
    • Spring
    • July 4th
    • Fall
    • Halloween
    • Christmas
  • Silhouette CAMEO
    • Cricut
  • Privacy/Disclosure

Painted Burlap Bunny Sign

April 2, 2014 by Holly Gagnon 12 Comments

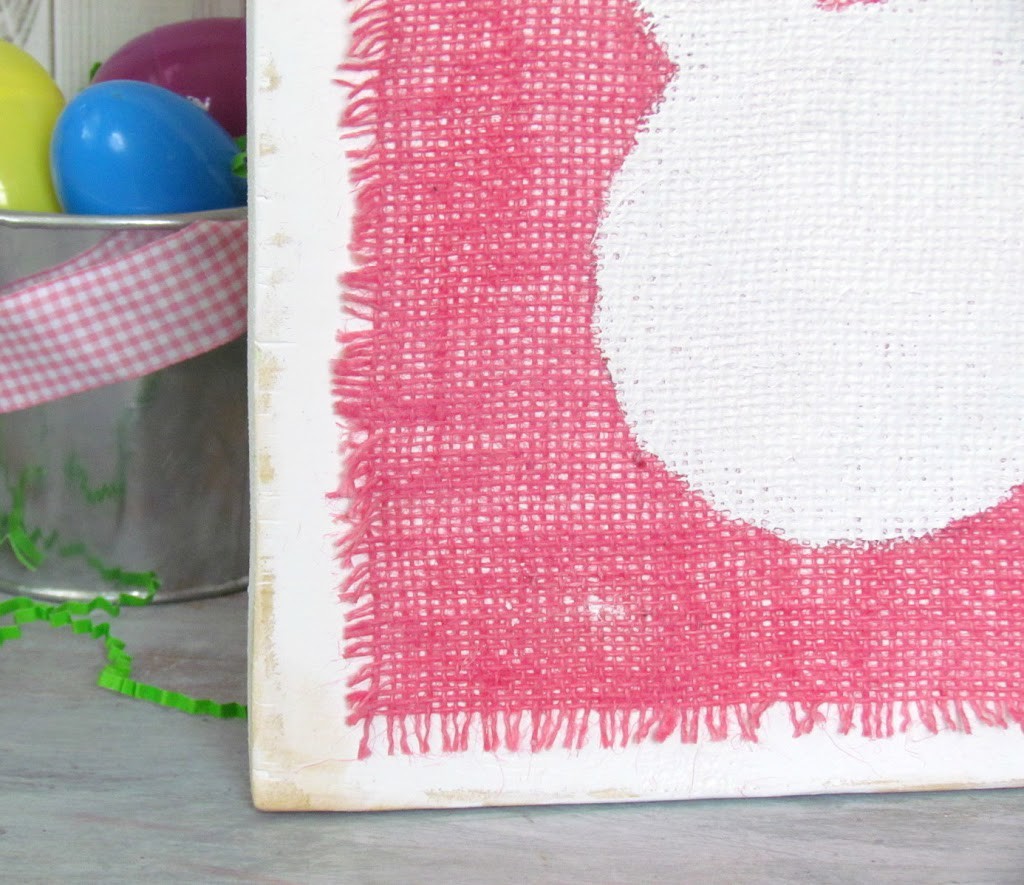
Who loves burlap??  Me!  Who loves pink burlap?  Me again!   I happen to own burlap in 9 different colors and most of it’s never been used.  I’ll spy it on the fabric store shelf and  my inner burlap Selfie says…”must have”.   Inner Selfie is a prob sometimes.  Since Spring is here, I decided to use my pink burlap and make a painted Burlap Bunny Sign out of it.

Painted Burlap Bunny Sign. All you need is a wood board, white paint, burlap, bunny stencil and decoupage. Easy Spring Craft!

{This post contains affiliate links referencing products used}

Painted Burlap Bunny Sign

This sign was a such a simple project to make too.  Decoupage burlap onto a wood board then trace and paint a bunny template.  That’t it…total adorbs too!Painted Burlap Bunny Sign

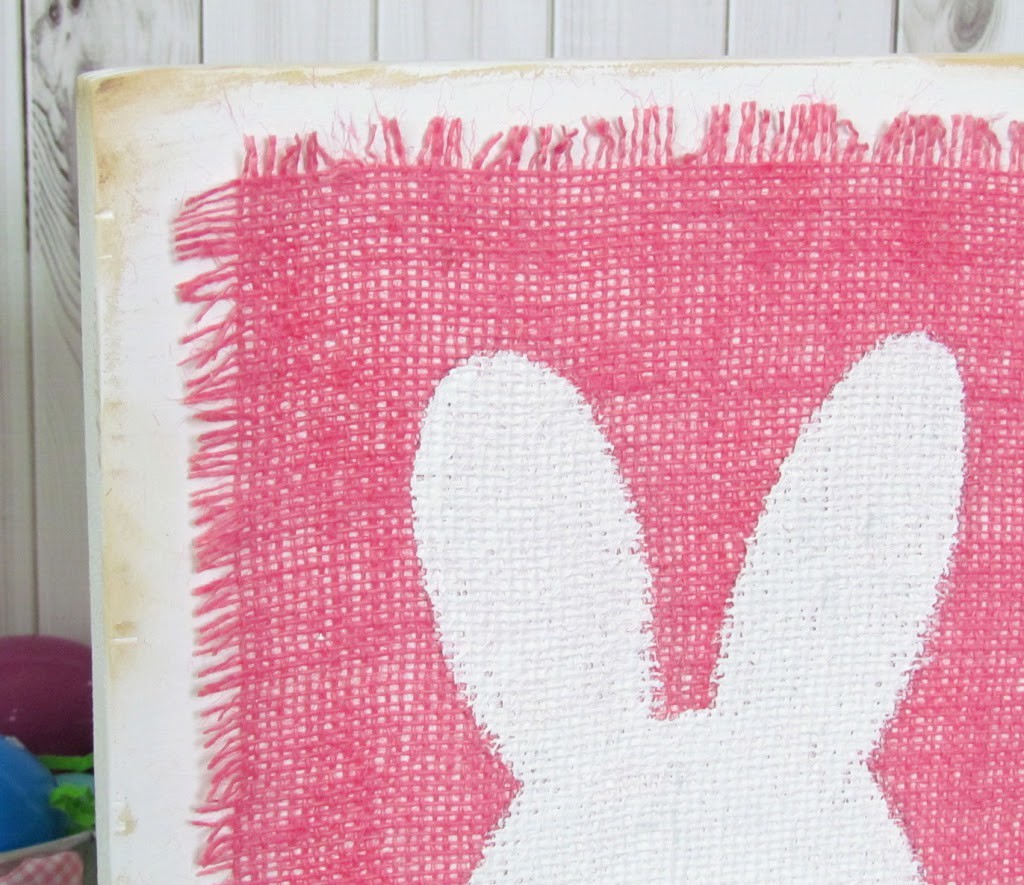
To make this Burlap Bunny Sign, I used DecoArt  Paint and Decoupage along with my Silhouette CAMEO to cut out a Pebbles in my Pocket  Bunny Garland cut file to use as the template.

How to make a Painted Burlap Bunny Sign

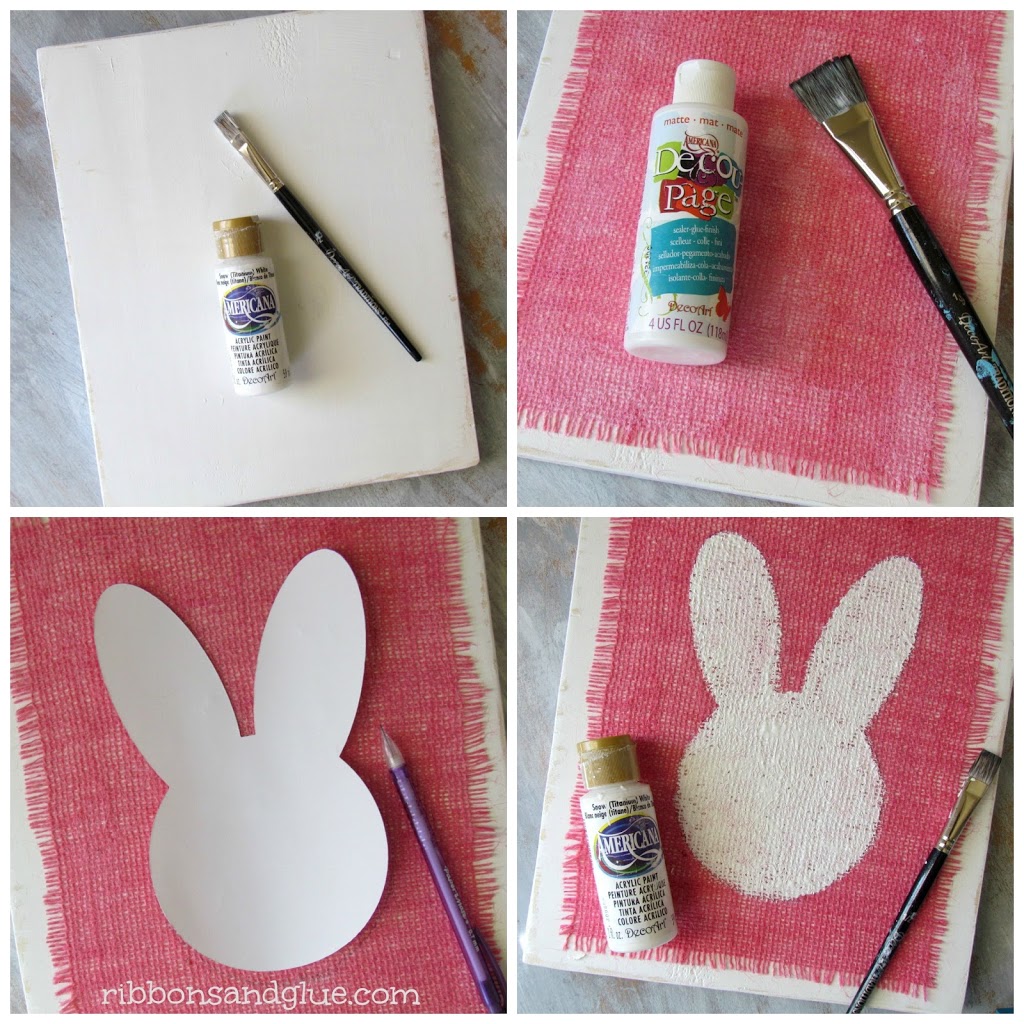
  1. Paint and lightly distress wood board
  2. Decoupage Burlap on to board
  3. Trace Bunny silhouette template
  4. Paint traced template

Painted Burlap Bunny Sign

A little bit of extra distressing and fraying of the burlap completed this Painted Burlap Bunny Sign.
Holly Signature

Click on images to view more projects like this Painted Burlap Bunny Sign

St Patrick's Day Lucky Pallet Sign made with @echoparkpaper Lucky You kit
Pretty Paper Cone Wreath

All Free Holiday Crafts
Easter Crafts Under 10 Minutes!
Friday Finds

«
»

Filed Under: Burlap, Easter, Paint, Tutorials, Wood Tagged With: Burlap, DecoArt, Easter, Silhouette CAMEO, Spring, Tutorials, Wood

Comments

  1. Arin says

    April 2, 2014 at 2:56 pm

    super cute and easy! May be following your lead on this bad boy!

    Reply
  2. Heather says

    April 2, 2014 at 11:39 pm

    So cute! love the simplicity! Visiting from Tip Me Tuesday!

    Reply
  3. TracyM #6773 says

    April 4, 2014 at 8:30 am

    CUTE & FUN – LOVE the coloured burlap!!!

    Reply
  4. kami @ nobiggie.net says

    April 6, 2014 at 10:11 pm

    This is darling! Thanks for linking up!

    Reply
  5. Cathy says

    March 13, 2015 at 7:08 am

    I love this! I can see it done with so many shapes and colors: snowflake, snowman, tree, football helmet, seashells, etc. Thank you for sharing this fabulous idea!

    Reply
    • Holly Gagnon says

      March 13, 2015 at 9:15 am

      Thank you! So many possibilities and so easy too! Thank you

      Reply
  6. Jamie says

    February 11, 2016 at 9:54 am

    Hello. I was wondering about the decoupage step. Did you “paint” the decoupage medium onto the board, lay your burlap down on top, and then decoupage over the top? Or did you not decoupage over the top?

    Reply
    • Holly Gagnon says

      February 11, 2016 at 12:36 pm

      Hi Jamie. Yes, I applied decoupage on the back of the burlap then adhered it on to the board and didn’t apply another coat on top. Hope this helps! Holly 🙂

      Reply
  7. marthine says

    March 6, 2016 at 8:54 pm

    I really enjoyed the tutorial. Luv the bunny

    Reply
    • Holly Gagnon says

      March 8, 2016 at 11:17 am

      Thanks so much for stopping by! Holly 🙂

      Reply
  8. Aki A. says

    March 24, 2016 at 2:05 pm

    This is so cute! I love the pink. Thank you for linking up at Friday Finds!

    Reply
    • Holly Gagnon says

      March 25, 2016 at 7:52 am

      Thanks so much Aki! Thanks for stopping by too! Holly 😉

      Reply

Leave a Reply Cancel reply

Your email address will not be published. Required fields are marked *

Welcome! So glad you’ve dropped by!

Holly-Gagnon-Blog

Follow Me

  • Bloglovin
  • Email
  • Facebook
  • Instagram
  • Pinterest
  • RSS
  • Twitter

Sign up for Weekly Emails


Categories

My Work is MINE!

All content posted on this blog, unless otherwise referenced, is the original work of Holly Gagnon of www.ribbonsandglue.com. If you like my work, you are allowed to feature one photograph from my blog along with a link back. You are however, not allowed to alter my photograph in anyway. I currently design for various craft manufacturing companies and am compensated either monetarily or with products. I provide affiliate links to products that I use in my creations and receive a small percentage of purchases made. The opinions I express on this blog related to the products I use in my creations are solely my own and are not paid endorsements. Please be respectful of my original work and do not copy my original designs and attempt to claim them as your own. Any unauthorized use of my designs or artwork is prohibited. If you would like to use my designs or artwork for anything other than personal use, please contact me. Refer to contact info in the About me tab.

Archives

Disclosure Policy

DISCLOSURE POLICY Holly Gagnon is a participant in the Amazon Services LLC Associates Program, an affiliate advertising program designed to provide a means for sites to earn advertising fees by advertising and linking to Amazon.com.
SoFab Badge

Copyright © 2025 · Delightful theme by Restored 316