
Got a Cub Scout? I do and that’s exactly who I made these Rustic Salt Dough Ornaments for. I gave these ornaments to the Scouts for Christmas but they could really be given anytime of the year.
Right now, the Cub Scout Blue and Gold Banquet is the buzz among Scouts leaders so if you’re looking for an easy and personalized gift to make for the boys, Salt Dough Ornaments with their Scout Rank are perfect.

{This post contains affliate links referencing products used}
I refer to my involvement in Scouting as, “my other life”. I’m actually the Cubmaster of a Pack {Shhh…} as well as the 5th grade Webelos leader. I know, cray. Both of these duties take up a lot of my time and of course, I feel like it’s my duty to make special things for the boys. My boys are crazy fun yet drive me crazy at the same time.
So, to make them something special, I gave them DIY Ornaments with their Scouts Rank emblem. I found some recipes for making Salt Dough on Pinterest and they basically all contained these same directions and ingredients.
1 cup salt
1 cup flour
1/2 cup water (add more or less as needed)
Mix all together. Roll out. Cut shapes. Bake at 200 degrees for 2 hours turning half way through.
** Also, don’t forget to poke a hole through the dough before baking if you want to make an ornament**

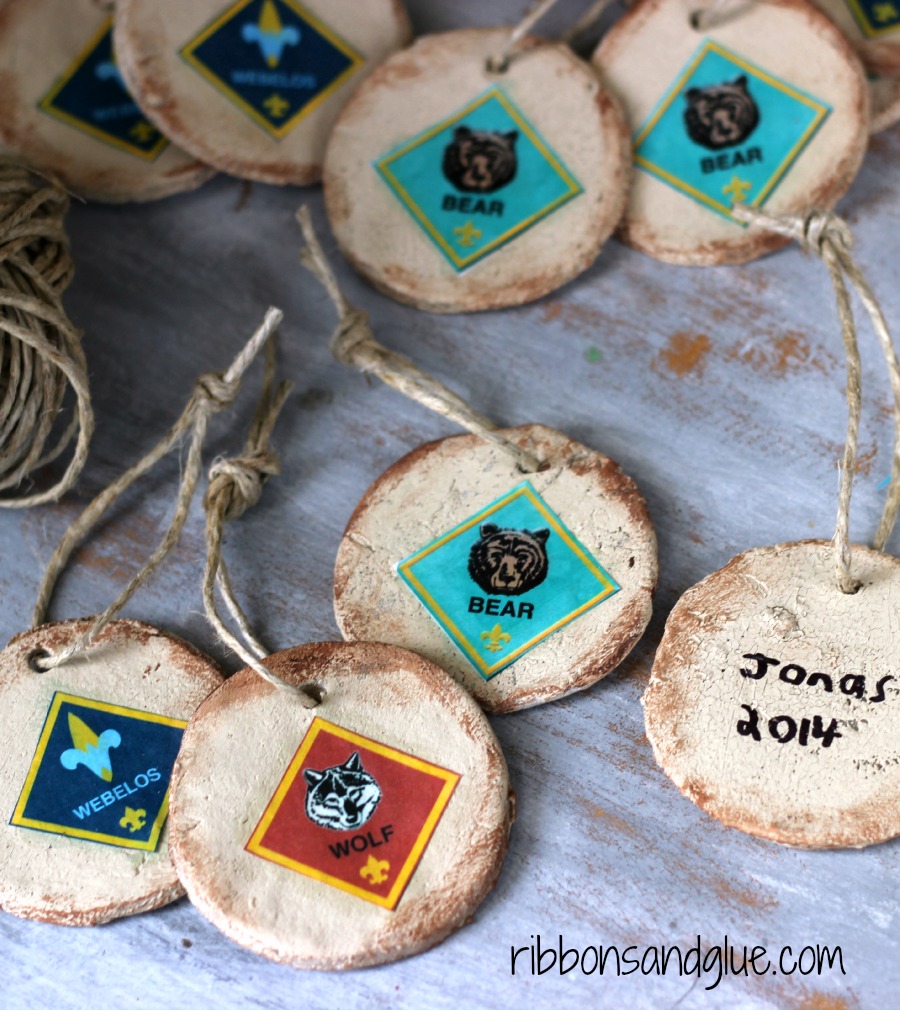
DIY Rustic Salt Dough Ornaments
After my ornaments were baked and cooled, I painted them with Americana Chalky Finish paints to give them the rustic look I was going for. Plus, my ornament were far from being Pinterest perfect so painting them covered up my imperfections while achieving a nice rustic texture.

I used my Silhouette Software to import Scout Rank clip art, adjusted it to the size I wanted then printed them off. I trimmed out the clip art {don’t ask me why I didn’t use the print-n-cut feature-duh} and used Mod Podge to adhere the ranks on to the front of ornaments.
The boys then wrote their name and date on the back of the ornaments with a Sharpie.
The ornaments were a hit, I loved the way the Rustic Salt Dough Ornaments turned out and it was totally worth my time and effort to make something special for my Scouts.
If you are looking for more Blue and Gold ideas, check out my post on Cub Scout Blue and Gold Centerpieces.

Click to view more ideas like these Rustic Salt Dough Ornaments


 Vickie says
November 6, 2015 at 10:50 amcool idea! thanks for posting this!
 Holly Gagnon says
November 7, 2015 at 10:58 pmThanks Vickie, these Salt Dough Ornaments were such a big hit too! Holly 🙂
 Jimmanee says
November 19, 2015 at 7:55 amI love these and want to make some for my son’s Tiger Den as Christmas Gifts. Can you tell me what two color of the Chalky Finnish you used? Thanks!
 Holly Gagnon says
November 19, 2015 at 12:19 pmThank you! I used the color Timeless with a dark wax but you could use any acrylic paints too. Good Luck! Holly 🙂
 Barbara says
November 28, 2015 at 4:57 pmDoes that need to be plain or self rising flour?
 Holly Gagnon says
November 29, 2015 at 6:49 pmHi Barbara, I just used the flour in my cabinet to make these which was prob self rising. I don’t think it matters really. Thanks so much!
Holly 🙂
 Becky says
December 5, 2015 at 9:32 amhow many does the recipe above make? Debating making for one den vs. the whole Pack. 🙂
 Holly Gagnon says
December 5, 2015 at 10:12 pmHi Becky. It’s been a while but I’m sure I only made one batch. I had about 16 boys to make them for and I did have a few left over. It also depends on what size circle you make. I do know, the Scouts and parents really like them so if you could make them for the whole Pack that would be great. Holly 🙂
 Kati says
December 7, 2015 at 3:31 pmHi! I am cubmaster too and would like to Make these ornaments before pack night (in 2 days ?). I just got the silhouette cameo but have only done vinyl on it. How did you cut out the scout emblems with color? Sorry, so new to the silhouette that I am not understanding where the color comes from.
 Holly Gagnon says
December 7, 2015 at 7:00 pmHi Kati, I actually used my Silhouette only to re-size and print off the clip art. You could trace them as a print and cut function but I just did it the old fashioned way with scissors. Good luck! The Scouts loved them too. Holly 🙂
 Kati says
December 8, 2015 at 10:13 amOk, thanks for clarifying and thanks for the great idea!!’
 Kati says
December 8, 2015 at 12:29 pmAlso, did you first paint with the light color and then go over the edges with the dark wax? Or did you go Over the entire ornament with dark wax after you painted. Thanks in advance 😉 Kati
 Holly Gagnon says
December 8, 2015 at 2:21 pmPaint the ornament with the light color then use a dry brush technique with the dark brown. If you don’t have the wax, you can use any dark brown paint. Any paint will work for this project. Good luck! Holly
 Charlie says
December 16, 2015 at 4:21 pmI’m a cubmaster and would like to try this as an activity for a pack meeting. How long does it take for the paint and Mod Podge to dry? Did you apply more than one coat or put a sealer on when done? I’m new to the Mod Podge projects.
 Holly Gagnon says
December 16, 2015 at 4:45 pmHi Charlie, It’s a great craft for the Cubs to make! The craft paint won’t take long to dry since the Salt Dough already has a rough surface and if the boys don’t apply the paint too thick. Mod Podge basically works as a liquid glue as well as a sealer too. Only a thin coat applied on the bottom and a thin coat on top is all that is needed. If the boys use to much Mod Podge, it may make the clip art ink run, smearing the image. Good Luck! Holly 🙂
 Heather says
December 11, 2017 at 9:35 amHi,
I’d like to make these at our holiday party aka December Pack mtg. I’ve never used midge lodge before. How do you do that part. I see you said to put it on the back and front of rank cutout. Do you Cove rthe whole front side of the ornament or literally just the cutout?
 Holly Gagnon says
December 11, 2017 at 6:39 pmHi Heather. Mod Podge is a decoupage glue I used to adhere the clip art on to the ornament. I brushed some on the bottom of the image to use as glue then brushed some over the top of the image to seal it. The boys loved them and they are are a fun keepsake. Good luck! Holly
 Heather says
December 18, 2017 at 10:46 amThank you! Can’t wait to make these!
 Kristy says
December 9, 2017 at 11:26 amWould it work to just use thick paper? I don’t have that awesome Silhouette deal, but I want to make these!
 Holly Gagnon says
December 9, 2017 at 4:13 pmHi Kristy. I just copy paper for this project. I only used my Silhouette to resize the clip art but if you have a photo editing program you may be able to do the same thing if needed. Good luck! Holly
 Heidi Harbuck says
February 16, 2018 at 7:06 amwhat size circle did you use?
 Holly Gagnon says
February 18, 2018 at 10:01 pmHi Heidi, I just used a drinking cup to cut out the circle. Prob 4 inches? Good Luck- Holly 🙂
 Grace (Webelos 1 and AOL den leader) says
January 23, 2019 at 7:42 amHello Holly, I want to make these for our upcoming Blue and Gold event but we have some Arrow of Light Scouts. The logo is not a diamond shaped like the other dens, Do you have any suggestions for me to create these for our AOL scouts?
Thanks!
 Holly Gagnon says
February 4, 2019 at 5:04 pmHello, I’m apologize I am just seeing this question now, you could always cut out the salt dough in a rectangle shape. Good luck! Holly
 Bonnie says
May 10, 2019 at 5:39 pmWe did something similar to this as a requirement in the Art elective a few years back. I had a flower shaped cookie cutter that our committee chairman heated up some to make it look like a paw and we used it as a memento when all the new boys made Bobcat that year. We had about two full dens (8 boys) receive it with their Bobcat rank.