Ribbons & Glue

a DIY Craft blog sharing unique projects and tutorials along with a few simple recipes thrown in.

  • Facebook
  • Pinterest
  • Instagram
  • Twitter
  • RSS
  • Blog
  • About Me
    • Creative Resume
    • Published Work
    • Craft Room Tour
  • Crafts
    • All Tutorials
    • DIY Projects
    • Wood Projects
    • Wreaths
    • Handmade Cards
    • Upcycled Projects
    • Simple Sewing
    • Best Craft Adhesives
    • DIY Decorative Clothespin Crafts
  • Seasonal
    • Valentine’s
    • St Patrick’s Day
    • Easter
    • Spring
    • July 4th
    • Fall
    • Halloween
    • Christmas
  • Silhouette CAMEO
    • Cricut
  • Privacy/Disclosure

Christmas Wrapping Paper Trees

November 27, 2015 by Holly Gagnon 2 Comments


Thanksgiving is over, now it’s full blown Christmas.   I’ve yet to pull out the tree but I have dug out a few boxes of Christmas decorations and I can honestly say,  I’m sorta tired of  my same ol’ same ol’ decorations.   Blame it on Pinterest.   For realz, I want to open a box of Pinterest  perfect Christmas decorations.    Of course,  changing up everything would be totally expensive so I have to find  inexpensive ways to make pretty changes.  Like using gorgeous Hallmark gift wrap  and trims to show you how to make Christmas Wrapping Paper Trees.


Easy tutorial on how to make Christmas  Wrapping Paper Trees. Wrapping paper is such a in expensive way to add unique projects in to your Holiday Decor.

Christmas Wrapping Paper Trees


I’m a sucker for rustic Christmas.  Just love the warm and cozy feel of  Kraft paper and bringing natural elements in to my home during the holidays.  Pine Cone are my favorite.    I was at lunch with a blogger pal Leanne, from Organize and Decorate Everything  the other day and I told her how I was going to Hallmark to do some shopping and she mentioned how she just made a project with wrapping paper.   Well, Hallmark has amazing gift wrap and gift trims so inspired by Leanne’s Cone Shaped Christmas Trees , I made my own version of  Wrapping Paper Christmas Trees, rustic style.


How to make Wrapping Paper Trees. All you need is pretty gift wrap, foam cones and double sided tape. Inexpensive way to all unique touches in to your Holiday decor.

How to make Wrapping Paper Trees

  1.  Leaving plastic wrap on foam cone, adhere double sided sticky tape along the side, point cone towards corner of paper rolling the paper in to a point.
  2. When you are happy with the size of your cone, adhere more sticky tape to secure the paper down.
  3. Cut and trim off excess paper, embellish with pretty trims.

Here’s a video tutorial on how to make these Wrapping Paper Trees as well as showing you all the beautiful supplies I found to make them at Hallmark.

Pom Pom Trims are so pretty to use at Christmas

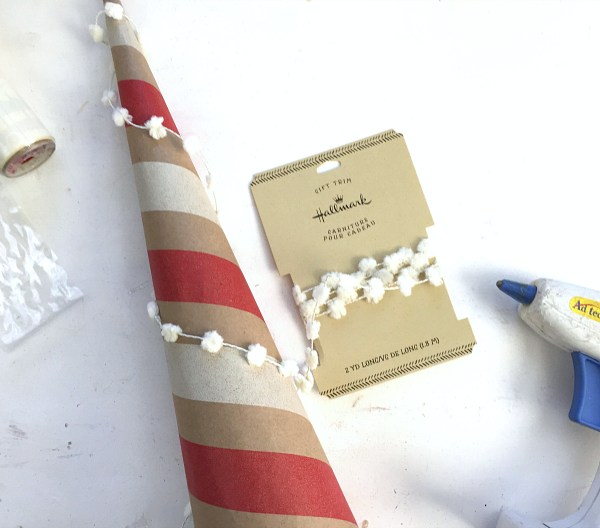
I embellished the Wrapping Paper Trees with pretty Hallmark Pom-Pom ribbon and other gift trims.

Glitter Deer heads add a beautiful touch to Holiday Decor and gift wrapoing

It was a no-brainier  that I needed these Glitter Deer heads I found in the  Hallmark  store too.  The  clothespin tags and pretty gold and white twine was a must too.

. Wrapping paper is such a in expensive way to add unique projects in to your Holiday Decor.


Christmas Wrapping Paper Trees. Such a pretty and expensive way to add unique projects in to your Holiday Decor.


Easy tutorial on how to make Wrapping Paper Trees. Wrapping paper is such a in expensive way to add unique projects in to your Holiday Decor.


Love the way these Wrapping Paper Christmas turned out.  Such a pretty and inexpensive way to change up my Holiday decor.  It also a great idea to have lunch with a another creative pal since you never know what will bring your inspiration.

Holly Signature

Click on images to view more projects like these Christmas Wrapping Paper Trees

easy-holiday-gift-box-bag


candy-cane-peppermint-seeds

«
»

Filed Under: Christmas, Tutorials Tagged With: Christmas, Tutorials

Comments

  1. Haley says

    November 28, 2015 at 12:00 pm

    These are super cute!!

    Reply
    • Holly Gagnon says

      November 29, 2015 at 6:49 pm

      Thanks so much Haley and super easy to make too. Holly 🙂

      Reply

Leave a Reply Cancel reply

Your email address will not be published. Required fields are marked *

Welcome! So glad you’ve dropped by!

Holly-Gagnon-Blog

Follow Me

  • Bloglovin
  • Email
  • Facebook
  • Instagram
  • Pinterest
  • RSS
  • Twitter

Sign up for Weekly Emails


Categories

My Work is MINE!

All content posted on this blog, unless otherwise referenced, is the original work of Holly Gagnon of www.ribbonsandglue.com. If you like my work, you are allowed to feature one photograph from my blog along with a link back. You are however, not allowed to alter my photograph in anyway. I currently design for various craft manufacturing companies and am compensated either monetarily or with products. I provide affiliate links to products that I use in my creations and receive a small percentage of purchases made. The opinions I express on this blog related to the products I use in my creations are solely my own and are not paid endorsements. Please be respectful of my original work and do not copy my original designs and attempt to claim them as your own. Any unauthorized use of my designs or artwork is prohibited. If you would like to use my designs or artwork for anything other than personal use, please contact me. Refer to contact info in the About me tab.

Archives

Disclosure Policy

DISCLOSURE POLICY Holly Gagnon is a participant in the Amazon Services LLC Associates Program, an affiliate advertising program designed to provide a means for sites to earn advertising fees by advertising and linking to Amazon.com.
SoFab Badge

Copyright © 2023 · Delightful theme by Restored 316