
Woo Hoo…My Craft Warehouse Guest Designer spot is finally here! I’ve been waiting anxiously about 6 months for this day to come. This was my assignment….we’ll send you some pretty paper, make a paper cone wreath and create a tutorial along the way. OK-Got it!I’ve made circular paper cone wreaths in the past but as a Guest Designer, I totally needed to kick it up a notch especially since I received cozy Echo Park Christmas This & That Collection Kit to play with…..Big Squeal! So, I decided to go big and make a Christmas Paper Cone Star Wreath.

Christmas Paper Cone Star Wreath

Supplies Used to make a Paper Cone Star Wreath:
- Echo Park – Christmas This & That Collection Kit (Love, Love, Looove!)
- Chip Board
- Star Template
- Kraft Paper
- Red 20 gauge wire
- Brown and Red Inks
- White Gel Pen
- Hot Glue Gun
- Glue Dots
- 3D Foam Squares
- Xacto Knife
- Rolling Tool

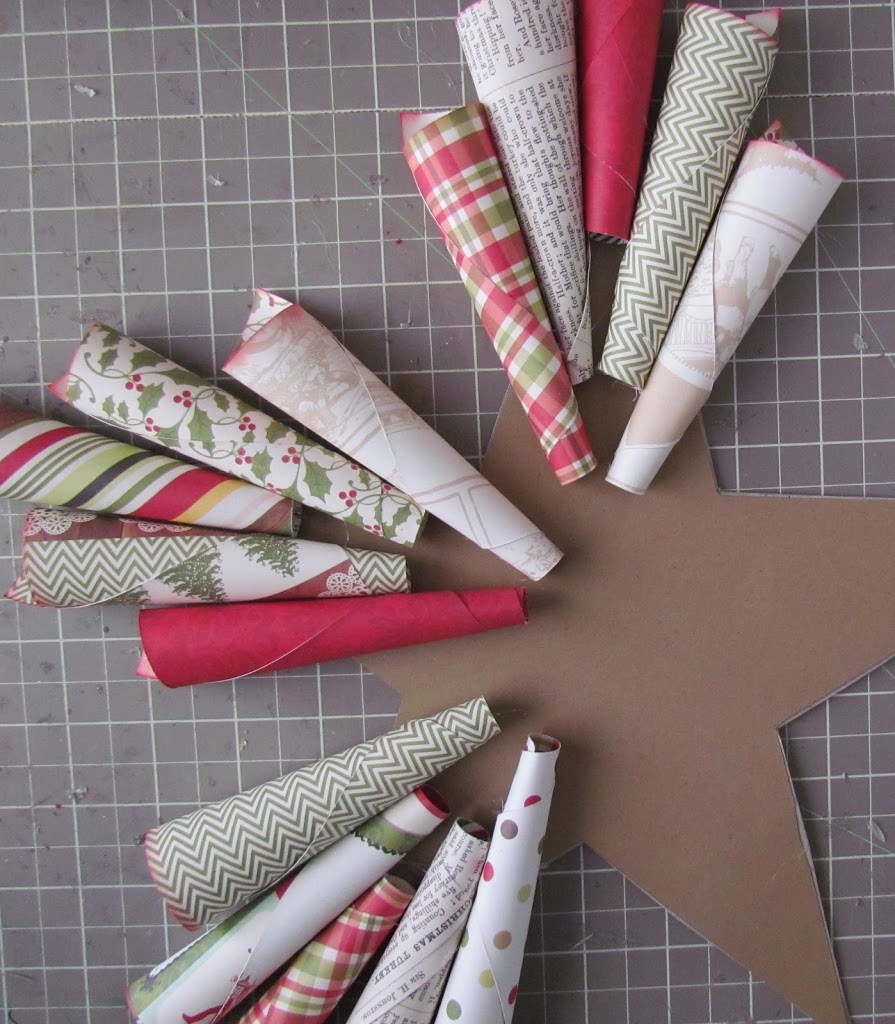
Cut a star out of chip board using an Xacto Knife. This will be the base of your wreath. I cut my star at 11 inches across.
To make the cones, you’ll need to cut a variety of patterned paper into 4×4 squares. To keep the cones symmetrical, I recommend using some sort of rolling tool, like a glue pen, fat marker, large dowel or any other tool that will do the job.
This tip will be very helpful later on ’cause you don’t want to have to many fatty and skinny paper cones when trying to make your wreath look symmetrical.

Keep on rolling and hot gluing them squares into cones. Ink the edges of the cones if desired. I ended up using 31 cones to complete my wreath.
Start hot gluing your cones on to each point of the star base first. It’s helpful to tack on the cones with hot glue at first instead of a big blob of glue. This will make life soooo much easier later if you need to pull the cones off and rearrange them as needed.

Fill in the gaps with more cones, shaping the wreath into a star shape. Now aren’t you glad you only tacked the cones on?
Remember how I also mentioned to keep your rolled cones as symmetrical as possible? Now that you’re filling in the gaps, to many fatty’s or skinny’s will throw off the balance. Don’t ya just hate that?


 Beckie says
December 7, 2012 at 4:12 pmEEK!!! I super love your wreath. It is AWESOME. Love the papers. Love your tutorial. VERY FABBY job. Congrats on the GD spot.
Be blessed, Beckie
 Arin says
December 7, 2012 at 4:41 pmThat is how you do it! Happy Birthday to me.. you just gave me the best gift with this post today! LOVE, LOVE, LOVE, LOVE, LOVE, LOVE, LOVE… I can’t tell you how much I love this wreath! Great guest designer spot! If you could not tell, I am totally obsessed with your paper cone wreaths! Happy FRIDAY friend!
 Creative M says
December 7, 2012 at 9:16 pmLOVE!LOVE!LOVE!Beautiful!Gorgeous & SOOOOO SWEET!
Have a Fabulous weekend,
Migdalia
 Tonna @ Navy Wifey Peters says
December 8, 2012 at 5:57 amBeautiful! Thanks for sharing at Submarine Sunday!
T’onna
 Tonna @ Navy Wifey Peters says
December 9, 2012 at 12:33 amHello again Holly! Thanks for linking up at Submarine Sunday last week. I’ve featured this craft at this week’s party! Stop by and grab a feature button!
T’onna
Submarine Sunday Link Party
 Tonna @ USS Crafty says
January 23, 2013 at 7:42 pmJust wanted to let you know that my blog address has changed. Long story… I’ve moved everything over to http://www.usscrafty.blogspot.com. I hope you’ll follow me there!
T’onna @ Navy Wifey Peters Aboard the USS Crafty
 Lauren says
December 8, 2012 at 9:42 amWow, that looks amazing! Great tutorial too, very clear instructions. Thanks for sharing at Unstampabelles.
 Merry says
December 8, 2012 at 9:10 pmThis is so very creative….wonderful papers you have used and a great tutorial. Glad you shared it with us at Unstampabelles.
 Sherrie K. says
December 9, 2012 at 12:42 amHolly, this is FABULOUS! What an amazing and creative piece! Absolutely love it!
Sherrie K
http://sherriescraps.blogspot.com
 Kristen says
December 9, 2012 at 1:19 amaww this is so pretty! I love how this looks!
-Kristen-
Don’t forget to link up to Handmade Tuesdays @ Ladybug Blessings http://www.ladybug-blessings.com
 Mariel says
December 9, 2012 at 4:54 amSo cute! I’d love for you to share this or any of your great ideas at the link party going on now (and every Saturday – Tuesday) at ‘Or so she says …’ Hope to see you there! http://www.oneshetwoshe.com
 Susan Hogan says
December 10, 2012 at 1:39 amWhat a fabulous project. It looks so good! Thanks also for the great tutorial! Good way to use up old left over christmas papers too! Thanks for joining in all the fun at Unstampabelles this month for Christmas!
 Chrissy + Nate says
December 10, 2012 at 8:40 pmBeautiful! Love the star in the middle with the stitched edges. So pretty!
Chrissy
http://www.everydaywiththejays.blogspot.com
 Christina at I Gotta Create! says
December 11, 2012 at 1:28 amLove all the color and texture!
Thank you for partying with the Wildly Original Crowd.
<3 Christina at I Gotta Create!
 Dixie n Dottie says
December 11, 2012 at 9:54 pmWhat a great idea! Would love if you’d join our Countdown to Christmas link party! Hope to see you there! Have a great week! 🙂
http://dixie-n-dottie.blogspot.com/2012_12_11_archive.html
 Christina at I Gotta Create! says
December 13, 2012 at 12:51 amOk… I’m back because you are a STAR over at I Gotta Create! Featuring you now. 🙂
Thanks so much for linking up,
<3 Christina
http://igottacreate.blogspot.com/2012/12/twelve-amazing-ornaments-wreaths-decor.html
 JanR says
December 15, 2012 at 4:16 amWow, what a creative idea! Thanks for joining us at UnstampaBelles.
 Maureen Reiss says
December 16, 2012 at 3:36 amWow!! This is Awesome!!!