
DIY Post It Note Holders are a simple gift idea that everyone can use. I know, it’s not the most exciting gift to give but sticky notes are practical, used all time and most of us could always have a few more laying around the house.

DIY Post It Note Holders
{this post contains affliate links referencing products used}
I’m one of those people who like to write my list’s out on piece of paper. I don’t wanna make a list in my phone no matter how many times the hubs suggests it.
I want my “To Do” list to be on a piece of paper { which I often leave at home by mistake or misplace} so I can scratch off my “To Do’s”. Really does make me look and feel like I’ve been productive for the day. Except when I misplace it…

You can simply upgrade those plain ole’ Post It Notes and turn them into quick and simple gifts by using pretty patterned paper and a Score Board.
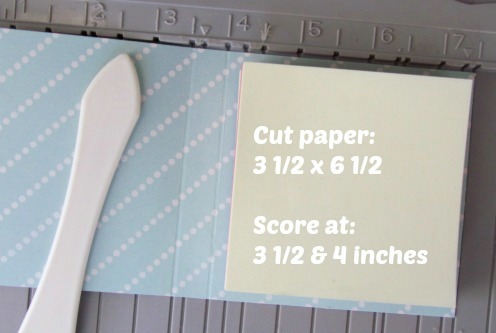
Cut your patterned paper at 3 1/2 x 6 1/2 inches then using a Score Board, score the paper at 3 1/2 x 4 inches. This size holder will hold about 3 note pads. Just remove the brown paper backing and adhere the pad on to the holder.

You can then decorate your Post It Note Holders any way you like. I embellished mine with the Pebbles Inc From Me to You collection { perfect name for this project too) along Xryon double sided tape to make DIY Glitter tape.

Adhere Xyron double sided tape to paper, remove backing, sprinkle glitter, remove excess glitter and Voila- DIY Glitter Tape!

Not the most exciting gift to give but Post It Note Holders can be really cute and if you’re like me, you can always use more.
This post was first seen on the Pebbles Inc Blog.

Click on the images to view other simple gift ideas:


 Rhonda Emery says
December 5, 2013 at 1:07 amreally cute gift love it. hugs
 Christina iGottaCreate says
December 6, 2013 at 12:49 pmI love practical prettied up!
Thanks so much for sharing at the party Holly!
<3 Christina @ I Gotta Create!
 Becky says
April 20, 2015 at 1:45 pmHow do you get the post it’s to stay put?
 Holly Gagnon says
April 20, 2015 at 1:51 pmHi Becky, just take off the brown backing and they will stay put. Holly 🙂
 Katrina says
April 20, 2015 at 7:25 pmThat’s the perfect end-of-year teacher gift! I’ve been looking for cute supplies to give!
 Holly Gagnon says
April 20, 2015 at 9:35 pmYes, it definitely would be a great gift! Thanks so much- Holly 🙂
 Cardstock Shop says
July 14, 2015 at 6:12 pmWe love this cute little project, Holly! Great gift idea and would make great party favors. We are sharing it on our Facebook page today, hope that is okay! TFS Susan
 Holly Gagnon says
July 15, 2015 at 10:38 amThank you so much and thanks for sharing it! Holly 😉
 Leslie says
July 23, 2015 at 8:23 pmAdorable!
 Holly Gagnon says
July 24, 2015 at 10:04 amThank you and they are such a simple and practical gift too! Holly 🙂