

- adhering glitter evenly without making a mess on your project.
- adhering delicate or sheer ribbon so you can’t see your tape/glue application.
- useful in making twine embellishments.
Every crafter has various techniques or adhesives they choose to use but I like using this small Xyron because I know I can get an even application of adhesive every time.

First step, run your die cut face down (which is the side of the adhesive) through the Xyron. Rub well to active the adhesive then peel off the backing.
I’m going to add glitter to the word Baby for my project. The letters are cut from Cricut Birthday Cakes cartridge at 1 inch.
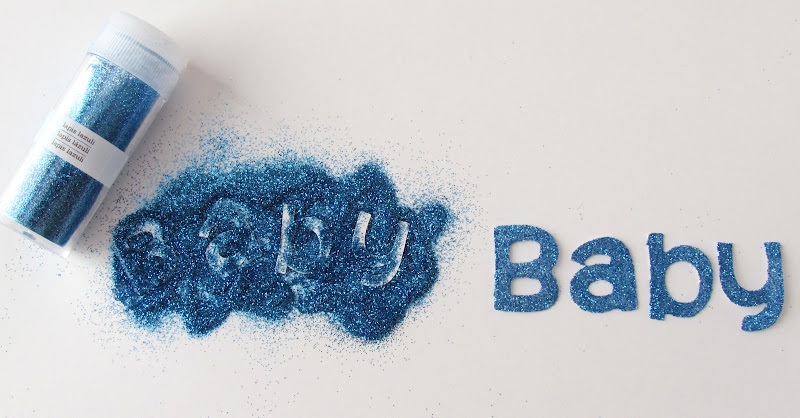
For my finished project, I used crystal glitter but you can’t see it in the photo, so in this example, I used dark blue glitter. After you shake off the excess glitter, you can see how the glitter sticks really well, evenly covered and dry, unlike using glue.

Another fun embellishment I’ve made using a Xyron are these twine buttons.
To make these twine buttons, I run my circle through the Xyron, cover the adhesive side with small pieces of twine, trim off the excess twine then ink the edges.

Here’s my finished project thanks to the Xyron adhesive. How sweet is this little gift bag cut from Cricut Plantin Schoolbook ?
Thanks for looking and I hope this little X-thingy is inspiring to you,


 Sugarlips says
March 22, 2012 at 1:57 pmThis is super cute I idea. I love the twine buttons. I think my little X is gonna start getting a workout 🙂
 Jennifer says
March 22, 2012 at 3:41 pmThank you! Just recently realized my X is Very important to my crafting =)
Love the twine buttons!
Jennifer
 CREATIVE M says
March 22, 2012 at 6:30 pmI love my X. I used it all the time.Especially with my ribbons.TFS!
craftingwithcreativem.blogspot.com
 Beckie says
March 22, 2012 at 7:13 pmGreat idea! Thanks for sharing. I super love that bag!!
Be blessed, Beckie
 Dawn says
March 22, 2012 at 8:43 pmLove your ideas! You are so clever… Thank you so much for the tutorial, great job!!! Hugs, Dawn
 mylittlecraftblog says
March 23, 2012 at 7:10 amGreat technique, Holly! I hardly ever use that Xyron tool, but you gave me some useful ideas. Thank you!
Evelyn
 Rosie says
March 23, 2012 at 1:42 pmLove the bag!!! What a great and easy way to attach the twine.
rosiemini@gmail.com
http://www.scraplovingminis.blogpot.com
 Cindy says
March 23, 2012 at 2:08 pmAWESOME job with your gift bag!I love the twine buttons,so CUTE!:)
 Megan says
March 23, 2012 at 2:59 pmThis is cute! I love what you did with the twine!
 Jill says
March 24, 2012 at 5:12 pmGREAT tutorial Holly! Thanks for sharing this! I was confused at first…I was like, “where is the baby in blue on her finished project”…then I read your post! ha! I like the crystal color you chose! Well done, girl! SMiles, Jill
 Handmade Creations by Stephanie says
March 28, 2012 at 8:09 pmThis is adorable!!!!!Thanks for playing along with us at Ribbon Carousel!!!
 Jill says
April 5, 2012 at 12:20 amThanks for adding your ADORABLE bag to DTC!
Smiles, Guest Designer Jill
 Rhonda Emery says
April 5, 2012 at 12:51 amwow this is more than adorable great idea. thanks for joining us at decorate to celebrate.
 Jean says
April 5, 2012 at 2:27 amHow sweet. Thanks for playing along with us at Decorate to Celebrate.
 Norma says
April 5, 2012 at 2:38 amWOW! Holly fantastic tutorial and I have one of those and I have to dig it out and put some use on it:) Your project is super cute and love the twine use on the project!! Thank you for joining us over at Decorate to Celebrate!! I always enjoy your entries:)
Hugs,
Norma
 Amy says
April 5, 2012 at 12:19 pmSuper cute container! I just love the way you used the twine!!! Thanks for playing at Decorate to Celebrate!!! :)Amy
 Sherrie K. says
April 17, 2012 at 1:55 amAdorable gift bag! I love the cute technique on the twine buttons. Super cute idea!
Sherrie K
http://sherriescraps.blogspot.com
 Linda says
April 21, 2015 at 1:36 pmThese are some very clever and unique techniques. Can’t wait to try them!
 Holly Gagnon says
April 21, 2015 at 11:01 pmThank you! Yes, there is a lot you can do with a Xyron. Holly 🙂