
Happy Spring to Everyone! Unfortunately, some of you are still being blasted with cold temps and Spring Snow…Blah! It’s good for the snow bunnies, bad for the gardeners. Today, I’m sharing a C.U.T.E Happy Spring Sign project with you embellished with various, spring ribbons from the Paper Mart store.

Happy Spring Sign
{this post contains affliate links referencing products used}

When I opened up the ribbon samples Paper Mart sent me to create with, I let out a little squeal and was soooo definitely going to make something with those green leaves. My thought was to have the leave ribbon climbing up something so I did just that! Don’t ya love it when creative ideas work out?

- Paint a wood plaque and paint stirrer white. Yep, the freebie stick you get from the paint store. They’re free. I have lots!
- Cut a spring die cut sentiment out of pink vinyl or you can use font stickers too. I used my Silhouette and a cut file from House of 3.

- Adhere Spring sentiment on to plaque.
- Distress wood plaque and free paint stirrer with distressing ink.
- Attach stick and plaque together using hot glue.

- Wrap Emerald Felt Leaves Twig Cord loosely around sign. {cute!}

- Snip off a few leaves to make into a felt flower.

- Attach green felt flower to sign.
- Embellish your Happy Spring sign with a button and CANDi’s.
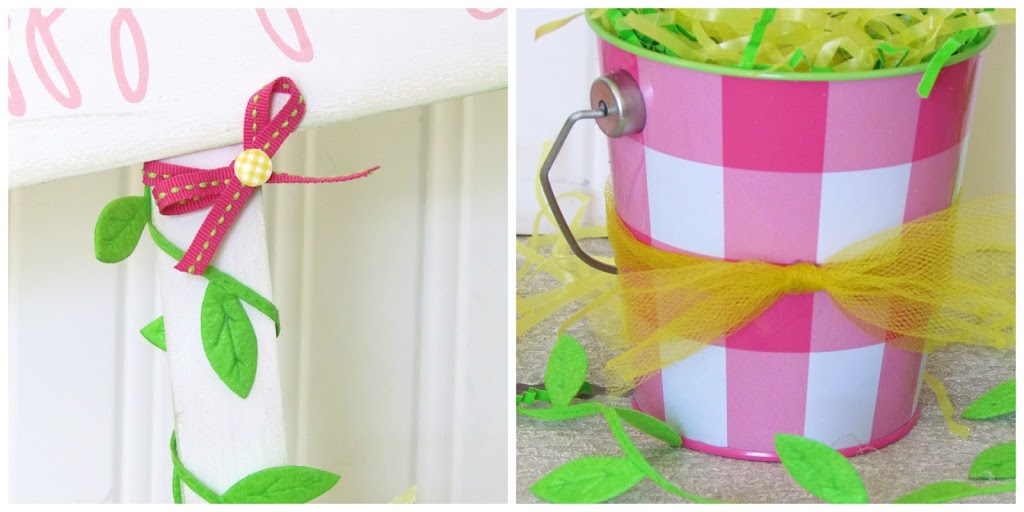
My Happy Spring sign still needed something else soooo, I added more ribbon!
- Tie pink and green Center Stitched Grosgrain ribbon around stick.
- Wrap yellow Tulle Ribbon around base. Who doesn’t love Tulle??
I love how my Happy Spring Sign turned out and love how the various ribbons provide such a unique and creative details too!


 Jill says
March 25, 2013 at 7:12 pmCute Cute Cute, Holly!!!! Thanks for linking up to Every Day is an Occasion!! SMiles, Jill
 Adrian says
March 25, 2013 at 7:26 pmVery cute!
 Missy says
March 26, 2013 at 3:21 amThis is just adorable Holly, I love that font on the sentiment and the super cute bows & leaves!!
 Desiree Fisher says
March 26, 2013 at 5:27 amWow soooooo cute, love how bright it is, thanks for sharing.
Desiree @ YourCraftyFriend
 Dawn Ruth says
March 26, 2013 at 8:56 amI love this such a nice fresh and pretty idea.
 Sherrie K. says
March 27, 2013 at 12:12 amWhat fabulous spring sign to have outside your door:) I love it-the felt flowers are darling and what a FUN pail! GREAT idea!
Thanks so much for joining us at My Craft Spot!
Sherrie K
http://sherriescraps.blogspot.com
 Amy says
March 27, 2013 at 1:53 pmThis is so adorable and creative! What a great tutorial!
Thanks so much for linking up at Give Me The Goods Monday! Can’t wait to see what you link up next week!
Amy from http://www.commona-myhouse.blogspot.com
 Kate (Small Bits of Paper) says
March 27, 2013 at 6:25 pmThis is spectacular, Holly! I LOVE those leaves! Your little sign looks fabulous with the distressing you’ve done contrasted with the bright colours! Great decor!
Thanks so much for playing along with us at My Craft Spot!
Kate
Small Bits of Paper
 Lisa Rukin Swift says
March 28, 2013 at 4:01 pmThis is darling!
 Anita says
March 29, 2013 at 2:00 amI just love this! The colors are awesome and so so happy looking. Great design. Thanks for sharing over at Craft Junkie Too.
Anita aka Nit
http://www.nitscreativecorner.blogspot.com
 Marisa says
March 29, 2013 at 9:13 pmThat is soooo cute. I found you on Craft Junkie Too and I am a new follower.
 Arin says
March 29, 2013 at 9:33 pmI love this! Way too cute and I love the way you distressed this!
 KC Coake says
March 30, 2013 at 7:18 pmSo cute! I love the leaves and how you used them to make a flower as well.
Thanks so much for linking up at Real Family Fun.
KC
 Gwen says
April 1, 2013 at 10:47 pmHolly, this is so cute!!! I love it, you always make the best things! Thanks for playing at My Craft Spot.
 Robin's Creative Cottage says
April 2, 2013 at 9:49 pmHi Holly my friend this is a fabulous spring decor project to brighten up the day!!! Love it!
Thanks for joining us at My Craft Spot 😉
 Jennifer Pilgrim says
April 7, 2013 at 7:18 pmThis is adorable! Pinned it & may feature it on my Spring Roundup this week. Thanks for sharing! Xo
Jenn Pilgrim @ The Newlywed Pilgrimage
 Denyse @ Glitter, Glue, Paint says
March 21, 2014 at 7:32 pmHow adorable! I love this and I will be featuring it in my Spring round-up in April 🙂
xoxo
Denyse